Video Lessons - Tips and Tricks!
People have asked me in the past about whether I’d consider doing video lessons and my answer had always been a resounding “no”. I thought video lessons were a great idea but when it came to drums there were just too many challenges. It’s a very large, physical instrument, not to mention the sheer volume of the thing which can be hard to control in a rehearsal room never mind going through a tiny laptop microphone. However in early 2020 coronavirus happened, the world stayed at home and we had to adapt! I was keen to give video lessons a go not only to keep my business going but to offer something to my pupils who had worked so hard and made great progress, I didn’t want anyone losing momentum. I stand by my original statement – A drum kit on a video call is incredibly problematic! However despite this, through a lot of research and even more trial and error, I have managed to get these lessons to a standard that has gone beyond “it’ll do for the time being” and I am now offering lessons in this style as a long term option.
This article consists of a few of my tried and tested methods and recommendations but is by no means the best or only way to do this. It it is absolutely worth spending some time in the beginning getting set up properly so that you can get the most out of your lessons so if you are considering taking lessons via video call, I hope this article helps! I teach mostly drum lessons and use Zoom for the video lessons so all of the information in this article will be using Zoom and drums as an example, however many of these tips and tricks can be transferred to your instrument or app of choice.
So why go to all this effort? What are we trying to achieve with this set up? Well the main aim is to make what is happening, what you are playing and how you are playing it as clear as possible to the teacher on the other end of the call. If your teacher cannot hear or see you properly they may find it difficult to advise you or may not notice certain techniques that aren’t quite right, and if you cannot hear and see the teacher properly it will make understanding what they are teaching you more difficult. There are 4 main steps you will need to work through to optimise your video call for a music lesson:
Set up a Zoom account
Adjust the audio settings
Set up your speaker and microphone
Set up your camera
Set Up A Zoom Account
You can enter a video call simply by clicking on the invitation link from your device, however Zoom runs a lot smoother and you have access to more settings if you download the app and create an account. The app can be downloaded from https://zoom.us/download onto the desktop of your PC or laptop, or from the Apple App Store or Google Play onto your phone or tablet.
2. Adjust The Audio Settings
By default Zoom is set to cut out any background noise. This is because Zoom, like most video calling software is designed with meetings in mind and in these situations you want to eradicate background noises (keys typing, chair squeaking etc). However, this is the opposite of what you want when playing an instrument as Zoom will detect your instrument as being unwanted background noise and try to cancel it out resulting in a very washy sound that is constantly cutting in and out. Very often the person playing the drums won’t notice this happening but for the person on the receiving end of the call (the teacher) it is very difficult to hear what is going on.
Fortunately, there are some simple adjustments you can make to the audio settings which stop this from happening and vastly improve the sound quality. You will need to disable any noise suppressors and also enable something called “original sound”. This is enabling the original sounds that are being picked up by the microphone to come through without being suppressed or altered by Zoom.
On a PC/Laptop:
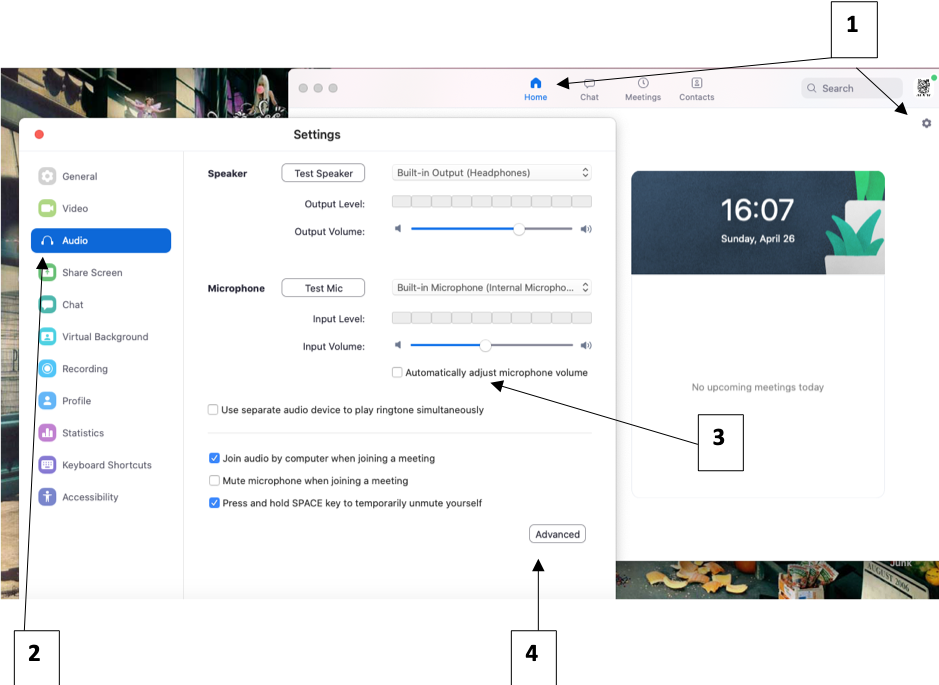
1. On the zoom app, in the home window go to settings.
2. Click on audio.
3. Uncheck automatically adjust microphone volume (you can set this once in a video call).
4. Click on advanced.
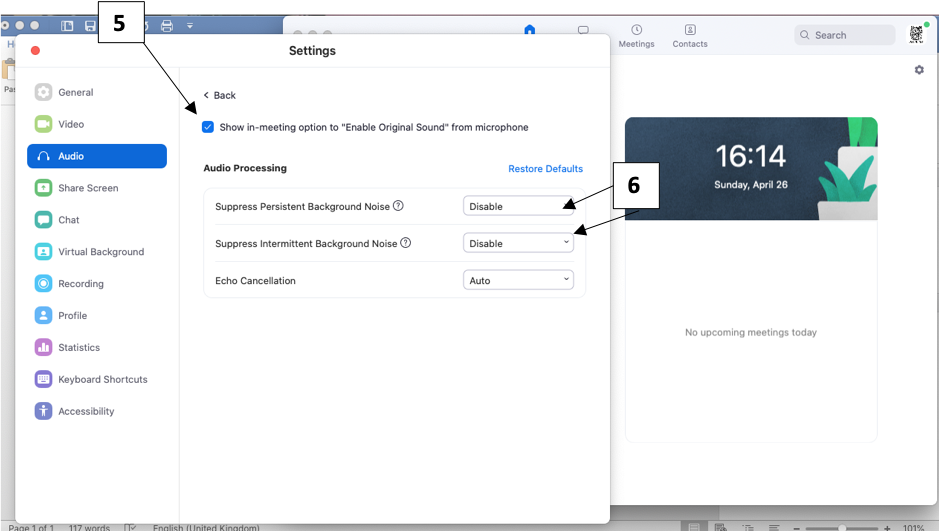
5. In Advanced check the box to “show original sound”.
6. Disable the two noise suppressors.
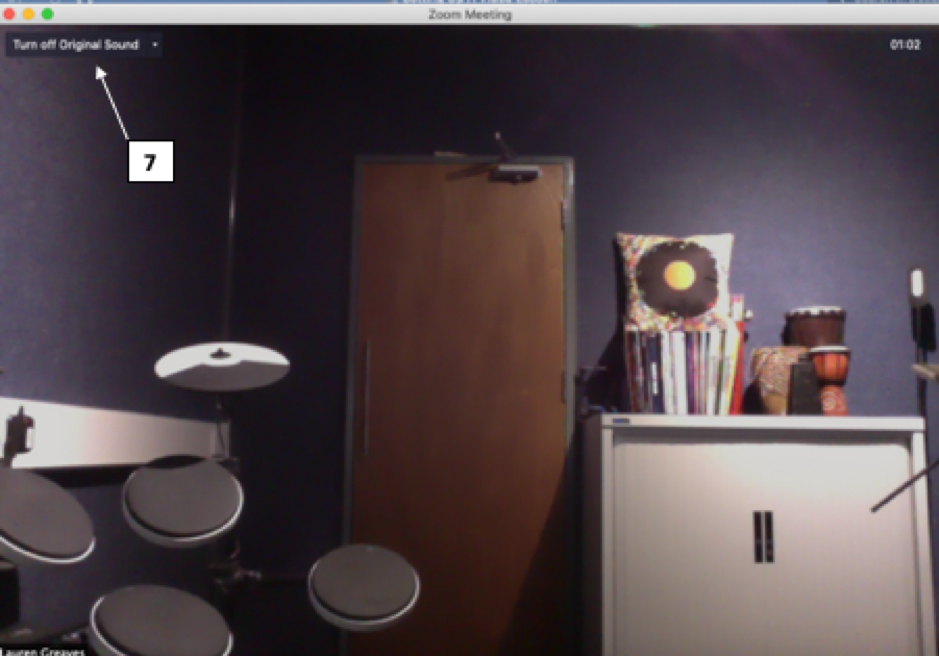
7. That’s it for adjusting the settings in advance. Once in the meeting check that your original sound options reads “turn off original sound” – this means original sound is currently turned on which is what you want.
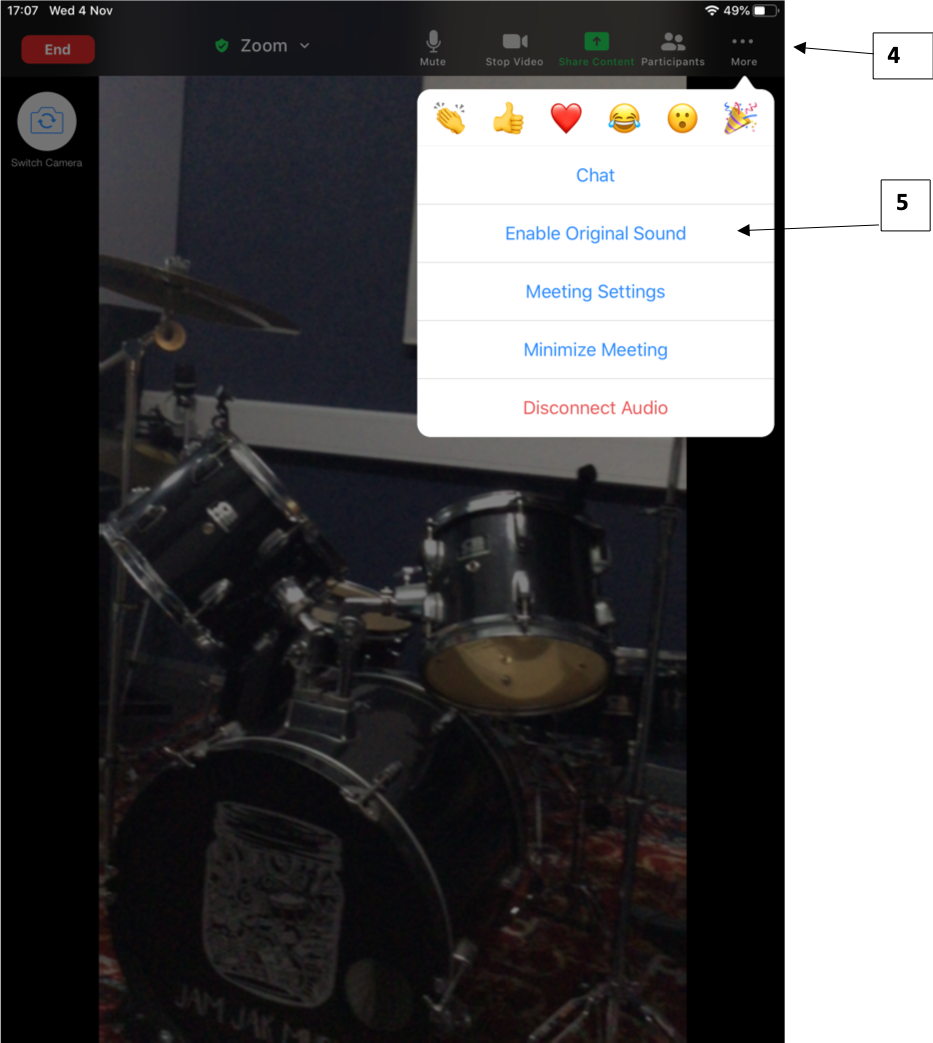
On A Tablet/Phone:
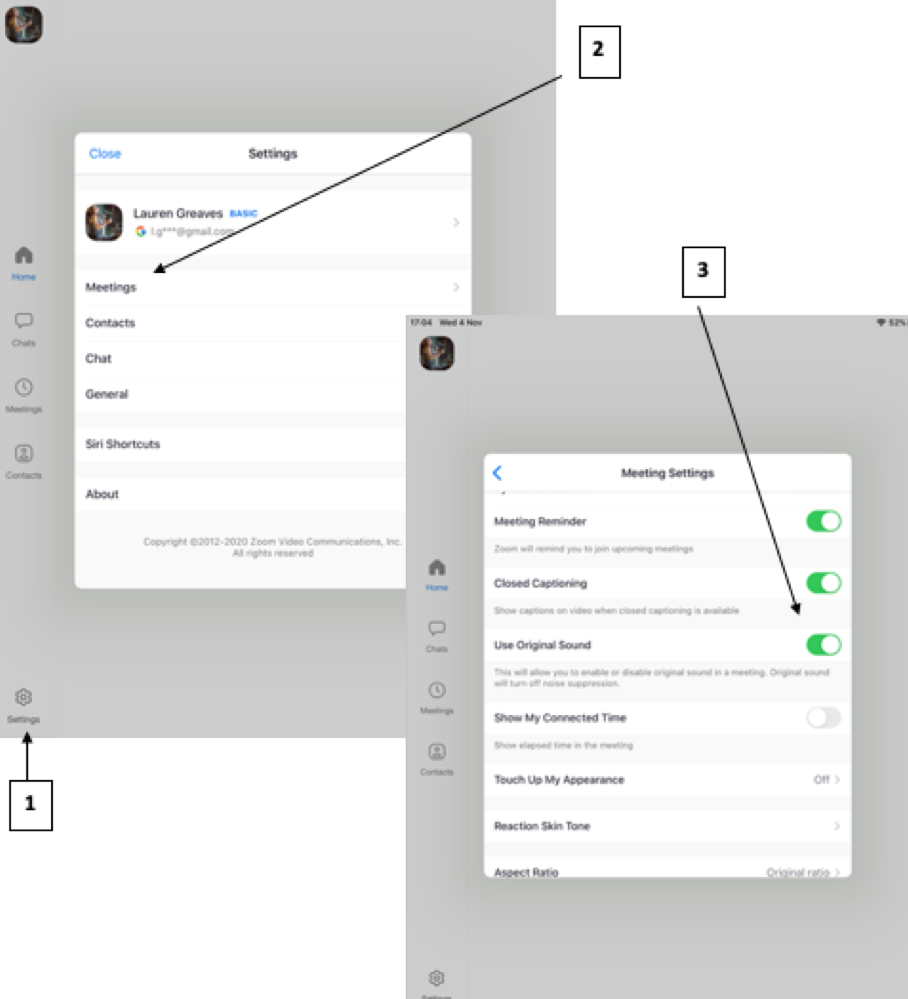
1. On the zoom app, in the home window go to settings.
2. Click on meetings.
3. Toggle on “Use Original Sound”.
4. Once in the meeting go to More.
5. Select enable Original Sound.
3. Set Up Your Speaker And Microphone
This might sound obvious but the terminology can get confusing so just to be clear …
Speaker = What the sound the you hear comes out of.
Microphone = The thing that picks up the sound that you make.
You can use the inbuilt speaker and microphone on your device or you can use any speaker or microphone that can connect to your device either directly or via an audio interface. You can switch speakers or microphones by clicking on the pop up menu next to the microphone icon during the meeting.
As long as you have adjusted your audio settings the standard speaker and microphone built into the device you’re running zoom on should be fine for a lesson, however you can if you wish use external speakers and microphones to upgrade your set-up. This may be worth thinking about if you are planning on having video lessons long term.
A few recommendations for speakers:
I would highly recommend using headphones as inbuilt device speakers are usually quite limited in terms of volume. For the purposes of a video lesson it really doesn’t matter what type of headphones you use as long as you have some. Unfortunately the sound quality of a drum kit in a video call will never be good enough for expensive vs cheap headphones to make a noticeable difference. I’ve tried my expensive in ear monitors and also my cheap Bluetooth headphones and they both do the job just as well, the fact that I have the sound going directly into my ears provides me with the clarity I need to hear what’s going on.
The exception to using headphones would be if you have a shared or group lesson, or if you have a parent sitting in on the lesson who would also like to listen. One solution to this is to use a headphone splitter which will allow multiple pairs of headphones to be connected to the same device. Another solution is to use an external speaker which will usually connect to your device in the same way that headphones do via an aux cable or Bluetooth.
A few recommendations for microphones:
Whereas most people own a pair of headphones, microphones are a little more specialist, tend to be more expensive and are usually not something people have lying around the house. For that reason most people will end up using the inbuilt microphone on their device and usually as long as you have adjusted your Zoom audio settings this will do just fine. I have however included a few different options to consider which would upgrade your setup.
Audio Interface
An audio interface does a lot of things but in this context it allows you to connect instruments and microphones to your computer, this is how recordings are made. It is a piece of hardware that connects with your computer and will have inputs for XLR connections (microphones) and jack connections (guitars/electric drums etc). Just select your interface as your microphone in Zoom and anything that is connected to your interface will be picked up. Remember that as this is now your microphone selection your inbuilt device mic will no longer be picking up sound, so you will either need a separate talking mic plugged into your interface as well as your instrument or you will need to make sure that the mic being used to pick up your instrument will also pick up your voice when you are talking. An audio interface usually connects with a computer via USB however now days there are also options available for phones and tablets. Depending on the amount of inputs your interface has you could use multiple microphones which is especially useful when working with a drum kit as you can place mics on all or some of the parts of the drum kit. I won’t go into too much detail here about how to mic up a drum kit as there are dozens of different ways this can be done depending on the amount of microphones you have and the sound you are trying to achieve.
USB mic
These are microphones that connect directly with your computer via USB without the need for an audio interface, they are very popular with podcasters and vloggers. You can also get clip on mics (popular with reporters and presenters) that will connect using a 3.5mm jack connection (the most common connection on phones/tablets). You will need to experiment with the position your mic so that it can pick both your instrument and your voice.
Zoom Q2N
This is actually a USB mic but it gets a special mention because I love it so much! The Q2N camera by Zoom it is ideal for this situation. Zoom generally make portable microphones for location recordings, they are designed to get the best possible sound quality in just one device. The Zoom Q2N also has a camera built into the device so not only is it capable of handling the loud sounds of a drum kit but you can also use it as a camera if you wish. Before using it for video lessons I would use my Zoom Q2N to film and record live gigs and it handled the sound impressively well. This is a relatively inexpensive way to achieve better quality sound and video all in one device. (Side note – this is a different Zoom to the company that make the app, as far as I know Zoom the microphone company have nothing to do with Zoom the video call app!). For all the experimenting I’ve done with multi-micing the whole drum kit, I’ve actually gone back to using this simple little device for my video lessons purely because it does exactly what I need it to do with much less hassle and set-up time.
4. Set Up Your Camera
Just like the speaker and microphone, you can use the inbuilt camera on your device or you can connect an external camera. You can select which camera you would like to use in Zoom by clicking on the camera icon.
Try to set the camera up in a place where you and the instrument are in the middle of the shot, if the camera is built into the device that you are running Zoom on you will also need to make sure you can see the screen clearly. With guitar for example, place your device on a table/tripod, sit directly in front of your device so both yourself and the guitar are in shot and you can see the screen clearly in front of you. With drums finding a good angle is quite a challenge simply because most drum kits are too large to fit in the shot. Often placing the camera behind the drum kit gives a better angle for the teacher but it means you having to turn around to look at the screen. When I teach I tend to have a few camera set up which I switch between depending on whether I’m talking to the pupil or demonstrating something. The best single camera angle I have found is placing the camera on the floor tom side of the drum kit as most of the drums can be seen and you don’t have to turn around too much to see the screen.
Using an external camera is useful as you have more freedom to move your camera angle around without disrupting your main set-up which could potentially be running from something less mobile like a computer. For example, if the teacher needed a closer view of what you are playing on the snare you could move your mounted camera round to the other side, or higher up, or on the floor to view the pedals. The cameras don’t need to be ground breaking and the cameras in most modern phones (which can be used as external cameras either via wifi or USB connection) are actually very good quality.
A few recommendations for cameras:
Virtual Camera
This is a way of using your phone/tablet as webcam by connecting to your laptop/computer over a Wi-Fi connection via an app downloaded onto both your phone and computer. There are plenty of Apps available, simply search for virtual webcam on your app store.
USB Webcam
I would recommend getting a long USB cable as this will give you more freedom to position your camera and your screen separately and to move the camera around if needed. I’m going to bring up the Q2N again because it’s such a great all in one device! This is primarily a recording device however when you plug it into your computer via USB, it will give you the option to use it as a webcam. You can then use the Q2N as your camera (and microphone if you wish).
Tripod
Not a camera but a useful accessory! You can pick up a small tripod with a few different mounts for less than £20. The cheap ones may not be suitable for mounting a heavy film production camera on but they are ideal for a phone and will allow you to adjust the position, height and angle of the camera very easily.
Updates
Hopefully you found this helpful! Optimising my video lesson set-up has been based largely on trial and error so I will update this page with any new tips and tricks I discover along the way. If you would like any further advice or if you have any recommendations of your own then feel free to drop me a message!


